카테고리 없음
[JSP] 파일 업로드 기능 구현(Ajax, 비동기 통신, 확장자 필터링)
TwoIceFish
2021. 6. 30. 10:04

0. 시작하기 전에
JSP의 MVC 패턴, Ajax 비동기 통신, Servlet, DAO, DTO에 대한 기본 개념은 숙지하였음을 가정한다.
1. 개요
Ajax를 통한 비동기 통신을 이용하여 파일 업로드 및 DB에서 참조하는 법을 알아보자.
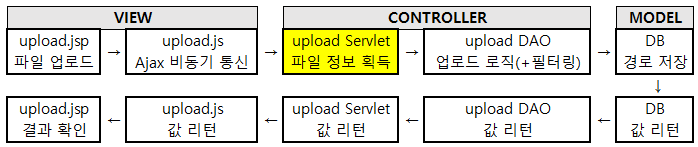
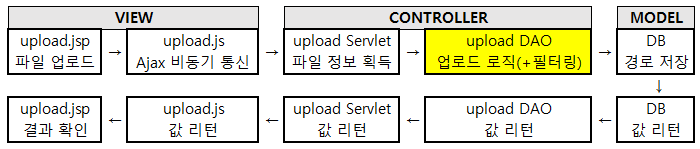
2. 로직

파일 업로드 기능을 구현하자면 위와 같다.
파일업로드('multipart/form-data', POST)
> 서버에서 파일정보 획득(Request.getPart)
> 파일정보 정재 및 DB 등록(저장된 파일 경로)
> 결과 리턴
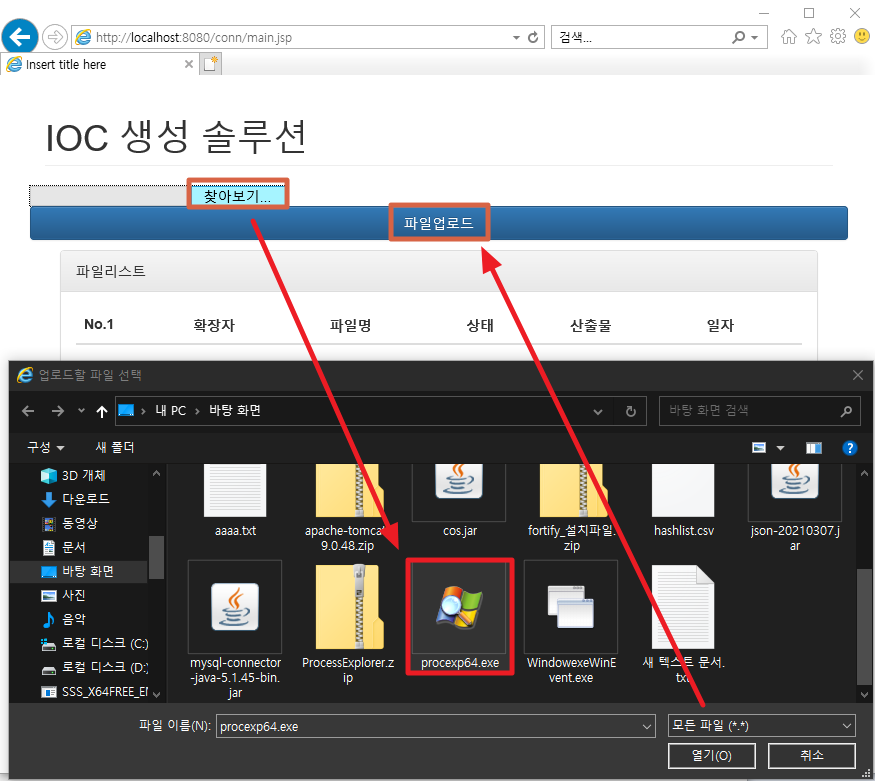
1. upload.jsp 파일 업로드

// 데이터 multipart/form-data를 POST으로 전송 지정 및 uploadFunction() 호출
<form method="POST" enctype="multipart/form-data" id="form">
	<input type="file" name="profile"/>
	<button type="button" onclick="uploadFunction();"class="form-control btn btn-primary">파일업로드</button>
</form>
2. upload.js Ajax 비동기 통신

// form으로 전달된 파일 데이터를 var data에 저장
// uploader 서블릿에 data를 POST multipart/form-data 형식으로 전송한다.
// 성공시 success의 data에 값이 반환, 실패시 error의 a 값으로 반환
function uploadFunction() {

	var data = new FormData(form);

	$.ajax({
		type: "POST",
		enctype: 'multipart/form-data',
		url: "/conn/uploader",
		data: data,
		processData: false,
		contentType: false,
		cache: false,
		timeout: 600000,
		success: function(data) {

			if (data == 1) {
				$('#statusMessage').html('파일업로드 성공.');
				$('#statusMessage').css("color", "green");
			}
			else {
				$('#statusMessage').html('파일업로드 실패.');
				$('#statusMessage').css("color", "red");
			}
		},
		error: function(e) {
			$('#statusMessage').html('파일업로드 에러.');
			$('#statusMessage').css("color", "red");
		}
	});
}
3. upload Servlet 파일 정보 획득
@WebServlet("/uploader")
// Annotation을 통한 파일 크기 및 업로드 위치 지정
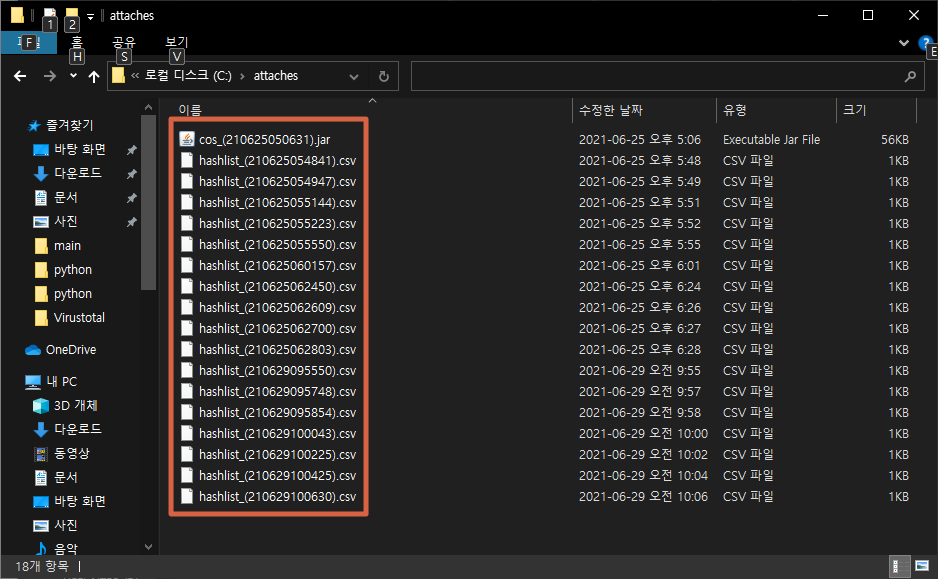
@MultipartConfig(maxFileSize = 1024 * 1024 * 100, location = "c:\\attaches")
public class fileUploadServlet extends HttpServlet {
protected void doPost(HttpServletRequest request, HttpServletResponse response)
throws ServletException, IOException {
request.setCharacterEncoding("EUC-KR");
Part part = request.getPart("profile");
// 파일 이름 획득
// fileName = "file_(06250000).exe"
String fileName = new fileDAO().getFilename(part);
if (fileName.equals("7")) {
response.getWriter().write("-1");
} else {
// 파일 서버에 업로드
if (fileName != null && !fileName.isEmpty()) {
// MultipartConfig location에 filePath로 파일 생성
// "c:\\attaches\\file_(06250000).exe"에 저장
part.write(fileName);
}
// DB 파일 이름 및 경로 작성, 연결 확인 후 DB에 파일 경로 저장
if (new accessdbDAO().connTest() == 1) {
if (new accessdbDAO().writeData(fileName) == 0) {
response.getWriter().write("1");
} else {
response.getWriter().write("-1");
}
} else {
response.getWriter().write("-1");
}
}
}
}
4. upload DAO(업로드 및 필터링)
public class fileDAO {

	public String getFilename(Part part) {
		String filePath = null;

		String fileName = null;
		String contentDispositionHeader = part.getHeader("content-disposition");

		String[] elements = contentDispositionHeader.split(";");

		// 일자 값 생성
		Date from = new Date();
		SimpleDateFormat date = new SimpleDateFormat("yyMMddhhmmss");
		String time = date.format(from);

		for (String element : elements) {
			System.out.println("서브스트링 전:" + element);
			filePath = element.substring(element.indexOf('=') + 1);
			System.out.println("트림 전:" + filePath);
			filePath = filePath.trim().replace("\"", " "); // " <- 쌍따옴표 지움
			System.out.println("트림 후:" + filePath);
		}

		// fileName = "C:\\downloads\\file.exe"
		// array = {"C:", "downlaods", "file.exe"}
		String[] array = filePath.split("\\\\");

		// fileName = "file.exe"
		fileName = array[array.length - 1];


		// fileName = "file.exe"
		// array2 = {"file", "exe"}

		// fileName2 = "a.b.c.txt"
		// array2_long = {"a", "b", "c", "txt"}
		String[] array2 = fileName.split("\\.");

		// 파일 확장자 필터링 후 파일 이름 정재작업 진행
		if (array2[array2.length - 1].equals("exe") || array2[array2.length - 1].equals("bat")) {
			return "7";
		} else {
			// 파일명에 일자 연결하기
			// 파일명에 다수의 Dot('.')이 있으면 IF 문 진행
			if (array2.length > 2) {

				// fileName = "a"
				fileName = array2[0];
				for (int i = 1; i < array2.length - 1; i++) {

					// fileName = "a.b"
					// fileName = "a.b.c"
					fileName = fileName.concat(".").concat(array2[i]);
				}
				// fileName = "a.b.c" + "_(" + "2106250000" + ")" + "." + "txt"
				// fileName = "a.b.c_(2106250000).txt"
				fileName = fileName + "_(" + time + ")" + "." + array2[array2.length - 1];

			} else {
				// fileName = "file" + "_(" + "2106250000" + ")" + "." + "exe"
				// fileName = "file_(2106250000).exe"
				fileName = array2[0] + "_(" + time + ")" + "." + array2[1];
			}

			// fileName = "file_(2106250000).exe"
			// fileName = "a.b.c_(2106250000).txt"
			return fileName;
		}
	}

}
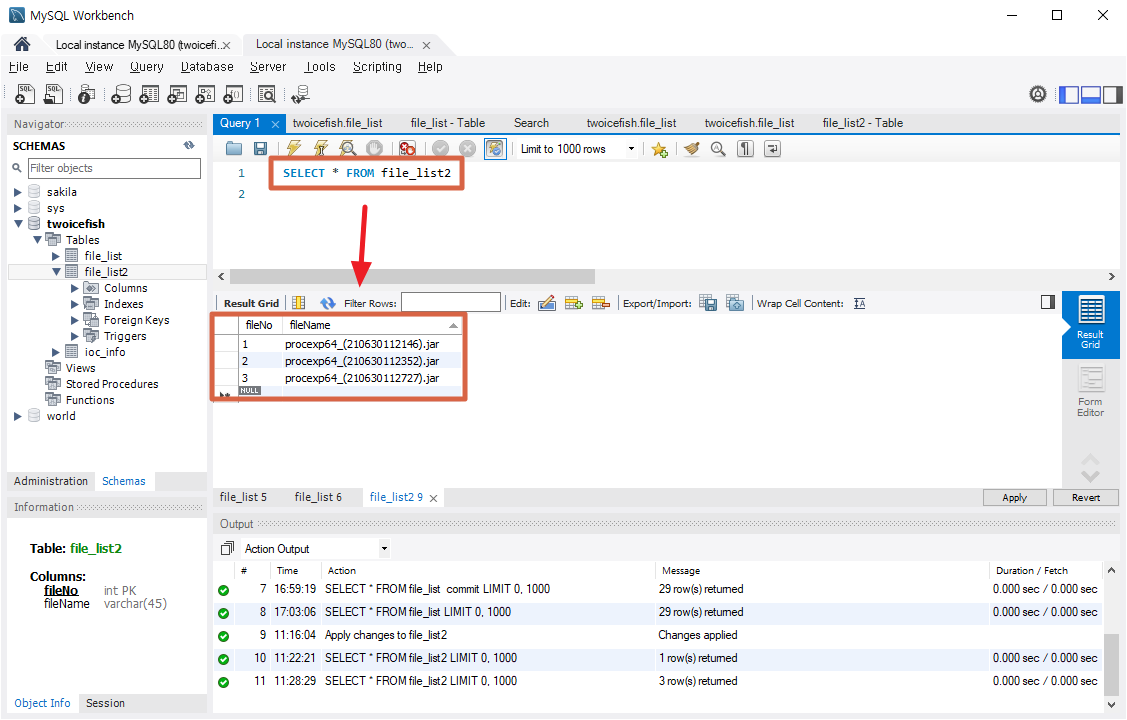
5. DB에 저장

DTO
public class accessdbDTO {

	public int getFileNo() {
		return fileNo;
	}

	public void setFileNo(int i) {
		this.fileNo = i;
	}

	public String getFileName() {
		return fileName;
	}

	public void setFileName(String fileName) {
		this.fileName = fileName;
	}

	public int fileNo;
	public String fileName;

}
public class accessdbDAO {
final String JDBC_DRIVER = "com.mysql.jdbc.Driver";
final String DB_URL = "jdbc:mysql://localhost:3306/[DB_NAME]?useUnicode=true&characterEncoding=UTF-8&useSSL=false"; // DB
// 접속
// //
// 주소
final String USERNAME = "root";
final String PASSWORD = "passwd";
public accessdbDAO() {
System.out.println("accessdbDAO Start");
}
// DB 접속 테스트
int connTest() {
Connection conn = null;
System.out.print("User Table 접속 : ");
try {
Class.forName(JDBC_DRIVER);
// Class 클래스의 forName()함수를 이용해서 해당 클래스를 메모리로 로드 하는 것입니다.
// URL, ID, password를 입력하여 데이터베이스에 접속합니다.
conn = DriverManager.getConnection(DB_URL, USERNAME, PASSWORD);
// 접속결과를 출력합니다.
if (conn != null) {
System.out.println("성공");
return 1;
} else {
System.out.println("실패");
return 0;
}
} catch (ClassNotFoundException e) {
System.out.println("Class Not Found Exection");
e.printStackTrace();
} catch (SQLException e) {
System.out.println("SQL Exception : " + e.getMessage());
e.printStackTrace();
}
return 0;
}
// DB에 데이터 반영
int writeData(String FILE_NAME) {
Connection conn = null;
PreparedStatement pstmt = null;
PreparedStatement pstmt2 = null;
ResultSet rs = null;
// file_list(int(key), string)
String setSQL = "INSERT INTO file_list VALUES (?,?)";
String getSQL = "SELECT MAX(fileNo) FROM file_list";
int FILE_NO = 0;
try {
Class.forName(JDBC_DRIVER);
conn = DriverManager.getConnection(DB_URL, USERNAME, PASSWORD);
// file_list 테이블에서 fileNo 최대값 가져옴
pstmt2 = conn.prepareStatement(getSQL);
rs = pstmt2.executeQuery();
if (rs.next()) {
FILE_NO = rs.getInt("MAX(fileNo)");
}
// 파일 경로 및 이름 유형을 DB에 저장
pstmt = conn.prepareStatement(setSQL);
// fileNo를 키로 1씩 증가시키면서 FILE_NAME을 등록)
pstmt.setInt(1, FILE_NO + 1);
pstmt.setString(2, FILE_NAME);
pstmt.executeUpdate();
return 0;
} catch (Exception e) {
e.printStackTrace();
} finally {
try {
if (rs != null)
rs.close();
if (pstmt != null)
pstmt.close();
if (pstmt2 != null)
pstmt2.close();
if (conn != null)
conn.close();
} catch (Exception e) {
e.printStackTrace();
}
}
return -1;
}
}
6. 결과(upload.jsp의 조회 결과 부분은 따로 작성 필요)